Because it matters
Making things happen, making things right, because it matters.
Need for speed — How to squeeze every last drop out of macOS Sierra
A macOS performance tweaking guide for hardcore Android developers

No doubt that Mac = beauty + performance, but why do we always hear developers complaining the slowness of their Macs? macOS, just like any other products, is optimized for the majority of users. We, software developers, are the minority. The tools we use, the long hours of we spend on a Mac, and the speed we need are different from the general public.
There is a huge amount of Mac performance tuning tips available on the Internet. I’ve tried a few dozens of them. None satisfies my need for speed. That is, to run my Mac at the fastest possible speed, without spending a cent.
So I made the following tips by trial and error. Mostly error.
Disable swapping
macOS tends to swap memory to disk when there are still tons of free memory available. Swap, aka. virtual memory, is disk-based and thus it is terribly slow, even on a lightning fast SSD. Disabling swap is absolutely fine, as long as you keep the number of running applications low.
When swap is disabled, macOS will try to utilize as much free memory as possible and won’t complain at all until under extreme memory pressure. When it does under pressure, kernel panic will follow. So keep an eye on memory pressure and you will be fine.
There are a number of different modes that macOS manages its memory. In vm_pageout.h:
#define VM_PAGER_DEFAULT                        0x1  /* Use default pager. */
#define VM_PAGER_COMPRESSOR_NO_SWAP             0x2  /* In-core compressor only. */
#define VM_PAGER_COMPRESSOR_WITH_SWAP           0x4  /* In-core compressor + swap backend. */
#define VM_PAGER_FREEZER_DEFAULT                0x8  /* Freezer backed by default pager.*/
#define VM_PAGER_FREEZER_COMPRESSOR_NO_SWAP     0x10 /* Freezer backed by in-core compressor only i.e. frozen data remain in-core compressed.*/
#define VM_PAGER_FREEZER_COMPRESSOR_WITH_SWAP   0x20 /* Freezer backed by in-core compressor with swap support too.*/
By default, in-core compressor with swap backend, or VM_PAGER_COMPRESSOR_WITH_SWAP, is used. You can verify this by the command below:
$ sysctl -a vm.compressor_mode
vm.compressor_mode: 4
Mode 0x1, VM_PAGER_DEFAULT, turns off memory compressor and swapping, which is proved to be harmful to the system stability. Modes 0x8, 0x10 and 0x20 are the so-called “freezer” modes, which “freeze” the OS instantly when memory is under pressure. You don’t want to try them.
Mode 0x2, VM_PAGER_COMPRESSOR_NO_SWAP, is the best choice here. It provides memory compressor with swapping disabled. In other words, when memory is under pressure, macOS will try to compress the active but non-wired memory, thus freeing part of the memory back to the system. macOS uses WKdm algorithm to compress and decompress the memory, which is fast and battery-efficient. Yet, kernel panic is still possible if there is no more compressible memory.
To change from mode 0x4 to 0x2, use this command and reboot:
$ sudo nvram boot-args="vm_compressor=2"
Tip: To modify any system internal settings, you need to first disable SIP.
When using mode 0x2, memory pressure must be monitored closely to avoid kernel panic. Once the compressed memory grows close to 50% of total memory capacity, you would either like to close some of the running applications, or simply reboot the system.
Avoid memory being compressed
Although memory compression is fast and is designed to relieve memory pressure, the best performance can only be achieved when none of the memory is being compressed. Use Activity Monitor or the following command to keep an eye on memory usage:
$ top -o CMPRS
From my experience, macOS starts to compress memory when the memory utilization is close to 80%. Try limiting the number of running apps to a low number, and restart or kill apps that consume excessive memory. Then your Mac should run as fast as it should. Use Activity Monitor or the following command to see which apps are using most of the memory:
$ top -o MEM
Android Studio and Gradle daemon
Android Studio alone consume about 1.5GB memory, which is reasonable. But when Gradle Daemon runs it instantly grows to an unbounded number. It is common to consume 5GB of memory compiling your project that can be compiled with 2GB of memory just fine.
With just one click, Gradle Killer kills the Gradle Daemon and free tons of memory instantly. Android Studio, on the other hand, continues to consume all the memory available, just like all other Java applications. Restarting it seems the only way to free the memory.
Don’t give too much to Android emulators
When you create an Android emulator using Genymotion or Android Device Manager (AVD), the default emulator configurations will be the same as the real devices. It allocates 2GB of RAM and 4 CPU cores for a Nexus 5X emulator, for instance. This may be fine on a desktop but very likely to be problematic on a MacBook or MBP.
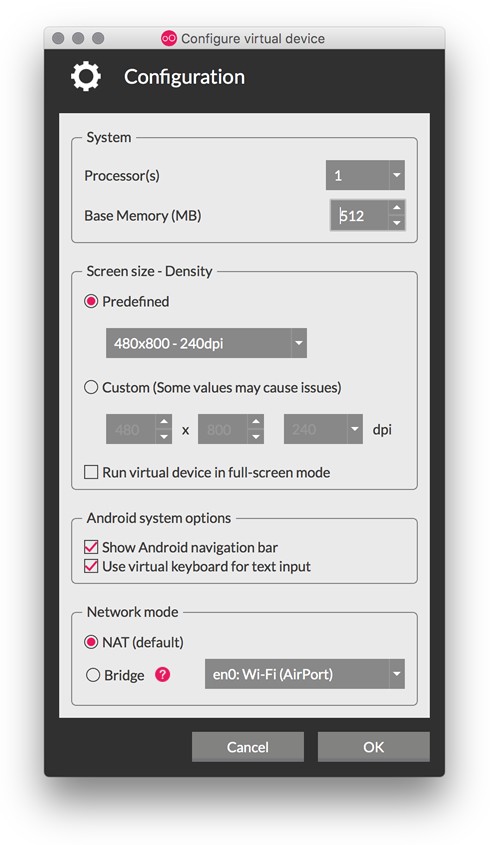
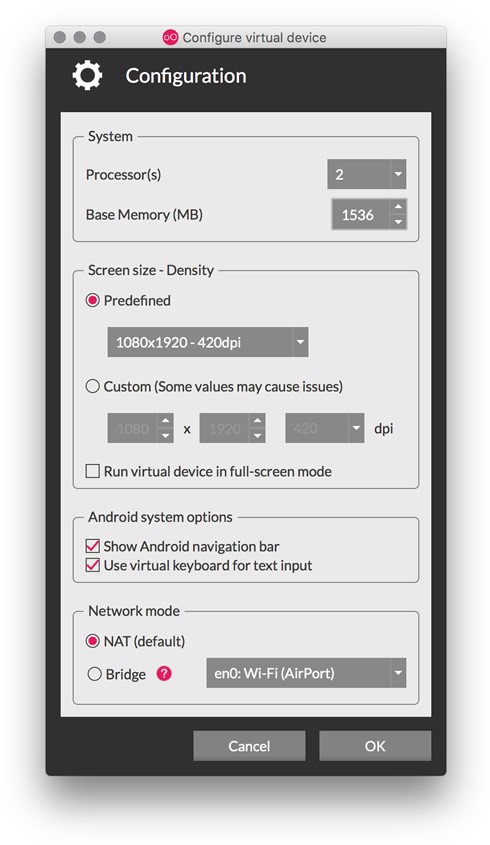
For most cases, we don’t need that much of memory and CPU cores. I suggest to give those emulators a minimal amount of resources as shown below:
-
Small devices: Small screen (480 x 800), 1 or 2 CPU cores, with 0.5 to 1GB or memory
-
Large devices: HD screen (1080 x 1920), 2 CPU cores, with 1.5GB or memory


It will degrade the performance significantly if you try to assign 4 CPU cores to an emulator on a dual-core Mac. With around 1 to 1.5GB of memory, your emulator will run just fine because it doesn’t ship with any bloatware that primary effect is to slow down your device.
Avoid using Electron-based apps
JavaScript is cool but Electron is not. Obviously writing Electron-based apps is the latest trend. Slack, Atom, GitKraken, Visual Studio Code, Zeplin, you name it! All these great tools have an Electron-based app. But don’t be fooled. They are not any better than their web-based siblings. Slack, for instance, consumes only a few dozens of megabytes on my Firefox. Why use the same service for 700MB more?
Kill crazy system services to free memory
macOS runs many services and apps in the background. Sometimes they go crazy and consume several gigabytes of your precious memory. The worst offenders are mds_store and softwareupdated.
mds, or metadata server, being part of Spotlight, it continuously scan and detect system changes and update its index. While usually it is lightweight, it seems it will never release any of the memory it uses. It grows from a few dozens of megabytes to an unbounded number. The only way to reclaim the lost memory is by killing it and let it restart itself.
$ sudo killall mds
softwareupdated is a daemon running at the background and notifies you when any new updates are available to your Mac. Very often, within a few hours using macOS, softwareupdated grows over 1.3GB doing nothing. What’s the point of consuming 1.3GB of memory just to monitor updates which are expected to be available only once every few weeks?
$ ps -ef | grep softwareupdated | awk ‘{print $2}’ | xargs sudo kill -9
The above command kills softwareupdated, which will be restarted later automatically when macOS thinks necessary.
Both mds_store and softwareupdated will be restarted by macOS so we need to kill them again when they go insane.
Some apps, especially Finder and Dock, consume quite a lot of memory sometimes. It is safe to kill then and let them restart themselves.
$ killall Finder
$ killall Dock
Suspend browser tabs to free memory
I usually find myself opening a few dozens of browser tabs within the first 30 minutes after arriving at the 9GAG office. We all like to keep tabs opened, just because who knows if you might need that website later. At the end of the day, with hundreds of tabs opened, your Mac can barely crawl.
Two browser plug-ins come in handy to solve this problem. With Suspend Tabs or The Great Suspender installed, those background tabs that has been idled for long enough of time will be “suspended”, meaning that its memory is freed while the tab is kept opened. The tabs will always be there until you intentionally close them.
Personally I prefer Firefox over Chrome, because Firefox uses much less memory than Chrome. And yet, both browsers seem to leak memory over time so it is necessary to restart your browser occasionally to avoid any memory pressure. A healthy browser should not consume more than 3GB of memory. Mine never go over 2GB or I will restart it.
Keep your Mac cool to avoid CPU throttling
It is easy for a MacBook to run hot while compiling programs or opening several apps at the same time. When the CPU gets hot, macOS avoids using its noisy fan but instead, throttles the CPU. It is common for the system load to go over 30 or even 100 for a dual-core MacBook Pro.
CPU throttling is done by kernel_task. It does not limit the clock frequency, but instead keep switching to less CPU intensive tasks until the CPU cools down. The switching introduces much overhead and hurt the overall performance.
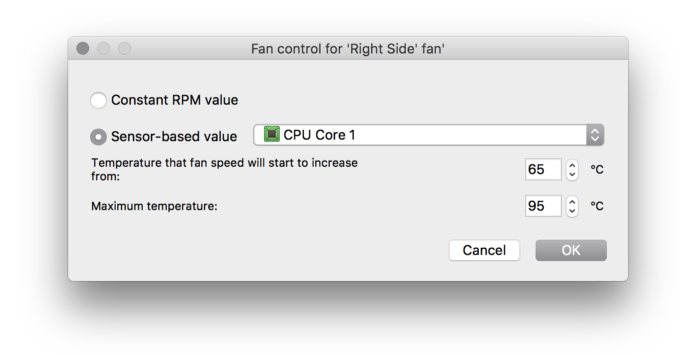
To let the CPU run at full speed at all times, we need to forcefully increase the fan speed to cool things down. Macs Fan Control is my personal favorite to keep my MBP cool. With a CPU of T_MAX = 105℃, the fan RPM starts increasing when the CPU is hotter than 65℃. When it reaches 95℃, just before throttling kicks in, the fan will run at full speed.

But be warned — it will be noisy. Very. Noisy. Everyone will hear your MacBook screaming when you are in a meeting room secretly compiling programs. But come on! Who cares? The CPU will be cooled down with seconds and the performance improvement is pretty noticeable.
Turn off eye candies
macOS is especially good at animations. While it consumes little CPU and GPU resources, those animation services consume quite some amount of memory. Plus, they become bored eventually. Disabling them proves to improve performance noticeably.
OnyX is a tool that lets you disable all kinds of animation in just a few clicks. It comes with many other utilities which is also very useful.
Disable antivirus apps
Though not recommended, disabling anti-virus apps does speed up macOS significantly. Because antivirus apps are slow, and the possibility of your Mac getting infected is relatively low, I would suggest excluding your Android project folders from antivirus scans. Otherwise, whenever Android Studio compiles your project, tons of file changes will trigger unnecessary scans by antivirus apps, wasting 10–30% CPU resources.
Don’t sleep
When macOS goes to sleep, it swaps, or compresses if swapping is disabled, most of the memory. Thus, next time when it wakes up, the performance will soon become intolerable. Disabling sleeping does help improve performance but this is not always recommended, especially if you are running your MacBook on battery. In this case, rebooting the system is the only option to reclaim its peak performance.
Programming on a Mac becomes great again
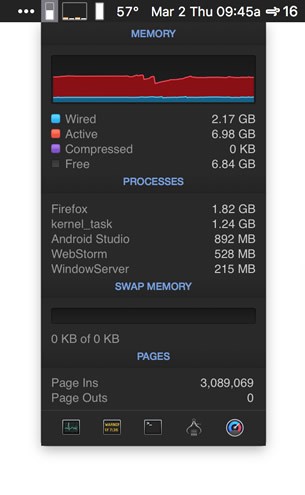
With all the above tips applied on my MBP, here is the typical memory usage:

To make my Mac run at full speed without rebooting it for days, I do the following housekeeping tasks:
-
Don’t ever let your Firefox or Android Studio grow over 3GB of memory
-
Restarting them takes only a few seconds, or they will torture you by slowing things down terribly
-
mds_storewon’t reach 200MB or I will kill it -
Disable swapping and try hard to keep compressed memory zero bytes.
-
Use web-based alternatives of services, e.g. Slack, Zeplin
Enjoy! Happy tweaking!
02 Mar 2017 by Alan Tai